My Map Location Tutorial - Where am I?
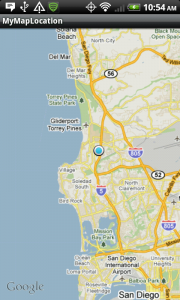
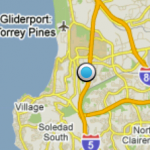 If you’re writing an Android App using a MapView, then you will most likely want to view the user’s location. This tutorial will show you how to create an activity that makes use of Android’s built-in MyLocationOverlay class.
Step 1: Obtain Google Maps API key
So you want to see where you are on a Google MapView in Android? Well, the first step in this process is to register for a Google maps api-key. This key will allow your app to integrate Google Map functionality, download tiles, and more. Visit this site first to get your key: http://code.google.com/android/add-ons/google-apis/mapkey.html
Step 2: Create a new Android project
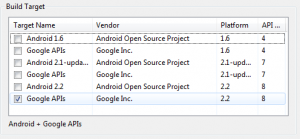
We will assume you have obtained your Maps API key, so you should make a new Android project. When selecting the build target, ensure you use the Google libraries version. These libraries have all the Android libraries, but add additional functionality like the map view elements.
If you haven’t downloaded any Google APIs libraries yet, you need to first do that using the Android package manager Eclipse plugin.
Step 3: Create a layout
If you followed the New Android project Eclipse wizard, you should have a main.xml in the layout folder. Let’s change it to add a MapView. Plus, add your Api key you got from Google in step 1 in the layout.
<?xml version="1.0" encoding="utf-8"?>
<LinearLayout xmlns:android="http://schemas.android.com/apk/res/android"
	android:orientation="vertical" android:layout_width="fill_parent"
	android:layout_height="fill_parent">
	<com.google.android.maps.MapView
		android:id="@+id/mapview" android:layout_width="fill_parent"
		android:layout_height="wrap_content" android:clickable="true"
		android:apiKey="[INSERT YOUR API-KEY HERE]" />
</LinearLayout>
Step 4: Create a MapActivity
If you followed the Eclipse wizard to create your Android project, then the default Activity is simply that - an Activity. You need to change it to MapActivity. If Eclipse shows an error for that class, then you didn’t select the Google API libraries as your build target in Step 2.
In your onCreate method, you will want to extract the MapView element from your layout, create a MyLocationOverlay class, and add that overlay to your MapView’s overlays. After that you should your onCreate should look something like this:
@Override
public void onCreate(Bundle savedInstanceState) {
    super.onCreate(savedInstanceState);

    // main.xml contains a MapView
    setContentView(R.layout.main);

    // extract MapView from layout
	mapView = (MapView) findViewById(R.id.mapview);
	mapView.setBuiltInZoomControls(true);

	// create an overlay that shows our current location
	myLocationOverlay = new MyLocationOverlay(this, mapView);

	// add this overlay to the MapView and refresh it
	mapView.getOverlays().add(myLocationOverlay);
	mapView.postInvalidate();
}
Step 5: Register for Location Updates
You’ve added the MyLocationOverlay class to your MapView, but it won’t do anything until you register for location updates. You could put this code in the onCreate method, but there is an opportunity to leak memory if your app is destroyed and you haven’t unregistered for updates. So we will put the register code in onResume, and important put the unregister code in onPause. This way, you will only receive location updates if you app is active and showing.
The code will look something like this:
@Override
protected void onResume() {
	super.onResume();
	// when our activity resumes, we want to register for location updates
	myLocationOverlay.enableMyLocation();
}

@Override
protected void onPause() {
	super.onPause();
	// when our activity pauses, we want to remove listening for location updates
	myLocationOverlay.disableMyLocation();
}
Step 6: Update your Manifest
If you were to try and run this code now, it would definitely not work. We need to modify our manifest.xml file to include the Google maps library, and add permissions to access the internet and location services.
Here’s a modified manifest file. Note: the uses-library section is correctly inside the application tag (a common mistake).
<?xml version="1.0" encoding="utf-8"?>
<manifest xmlns:android="http://schemas.android.com/apk/res/android"
      package="com.joshclemm.android.tutorial"
      android:versionCode="1"
      android:versionName="1.0">
    <application android:icon="@drawable/icon" android:label="@string/app_name">
        <activity android:name=".MyMapLocationActivity"
                  android:label="@string/app_name">
            <intent-filter>
                <action android:name="android.intent.action.MAIN" />
                <category android:name="android.intent.category.LAUNCHER" />
            </intent-filter>
        </activity>
    <!-- Make sure the uses-library line is inside the application tag -->
	<uses-library android:name="com.google.android.maps" />
    </application>
	<uses-permission android:name="android.permission.INTERNET" />
	<uses-permission android:name="android.permission.ACCESS_COARSE_LOCATION" />
	<uses-permission android:name="android.permission.ACCESS_FINE_LOCATION" />
</manifest>
Step 7: Fix MyLocationOverlay bug
Our current code may well run on your phone, but some phones have a bug in the MyLocationOverlay class (notably Droid X). So if you’re releasing a MapView app to the public, you will want to ensure your code does not crash on a buggy phone. (Do a web search for “MyLocationOverlay bug” for more details).
The fix is to create a class that extends MyLocationOverlay and catch the exception on buggy phones. If caught, you need to override the drawMyLocation method to mimic what the actual code should show.
The source code for this fixed overlay class can be downloaded from the link below.
Step 8: Grab this tutorial’s project source
The full source code for this project can be found here: http://code.google.com/p/android-my-map-location/
